How to make the PS4 controller vibrate continuously? [Updated 2022]
Several elements contribute to an outstanding PlayStation gaming experience. For example, you must connect to a reliable Wi-Fi network and utilise one of the top DNS servers for PS4 or PS5. Nevertheless, there are a few things we take for granted, such as the DualShock PlayStation controller. This controller is an excellent choice in terms of its capabilities, interoperability, and dependability. However, there are situations when more customization of the DualShock controller is desired. And if you wish to know how to make the PS4 controller vibrate, you’ve come to the proper place. Before we jump into the specific steps, let us tell you why you may want to make your PS4 controller vibrate continuously in the first place. As you can guess, it has to do with the overall gaming experience you expect from your PlayStation 4 console.
Why Enable Vibration on PlayStation Controller?
As said previously, the DualShock PlayStation 4 controller is one of the best of the PS4 controllers we have seen to yet. This controller plays a crucial part in creating an exceptional gaming experience. We will explore a situation in which Grand Theft Auto V is played on a PS4. If you have enabled vibrations on the smartphone, you may enjoy a more immersive gaming experience.
For instance, you will receive enhanced console input when your vehicle collides with an object or when employing a weapon. Similarly, if you play a title like Fortnite, you get to reap the benefits of improved feedback. Even if you disable vibration on the PlayStation controller, you can still play your favourite PS4 games; nevertheless, you should avoid doing so.
Thus, enabling vibration on the PS4 controller is primarily motivated by the desire to enhance the game experience. There could be additional causes, you know. Customizing one’s game experience is a nice notion for some individuals. Additionally, we must keep in mind that vibration is battery-intensive. If this option is enabled, the PS4 controller will run out of power sooner than expected.
Regardless of your motivation, there are many ways to enable vibration on the DualShock PS4 controller. We will discuss the native alternatives first, followed by the third-party ones.
How to Make PS4 Controller Vibrate?
We will examine the various methods for activating vibration on DualShock PlayStation 4 controllers. We shall examine the formal procedure first.

Method #1 Using PS4 Settings
Before you can customize the DualShock controller’s vibration patterns, you must first enable the vibration option. Fortunately, this is a straightforward process that can be completed on the Settings tab of your PlayStation 4. The necessary actions are outlined below.
- Turn on your PS4 and connect the DualShock PS4 controller to the device
- Now, go to Settings from the homepage and choose ‘Device.’
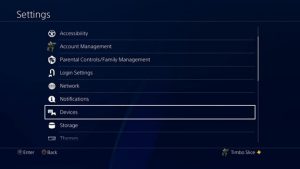
- On the next page, go to ‘Controllers’, and you can click on the option called ‘Enable Vibration.’
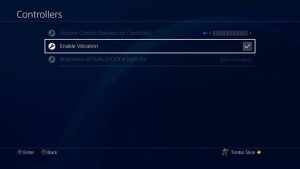
That is all. You have effectively activated vibration on the PS4 controller. In case you were unaware, you must complete this step prior to making further modifications, even if you intend to do so on a PC. Moreover, if you ever want to stop vibration on the PS4 controller, you may do it by following the same instructions. In the third stage, you can deactivate vibration by deselecting the option.
Herein lies the restriction, though. There are no more customization choices available in the PS4 settings. Obviously, the controller would vibrate due to the game’s design. In GTA 5, for instance, you may experience vibrations depending on various interactions with items and people. Alternatively, if the game is not 100 percent compatible, you may not have the same experience.
If you are in the second scenario, you might consider utilising a PS4 controller vibration software to make the controller consistently vibrate.
Method #2 Using the DS4Windows App
As previously stated, if you want your PS4 controller to vibrate continuously, you must utilise a third-party application such as DS4Windows. DS4Windows is a software that allows DualShock controllers to be used with Windows PCs. If you wish to utilise the PlayStation controller with your PC, you must install this.
To utilise this approach, you must configure a few computer settings. You must have a PC that meets the minimum hardware requirements. Additionally, Rocket League must be installed on the machine. Since Rocket League is free to play, this should not be an issue. Additionally, you must download the DS4Windows application from the official website. You can obtain the basic set of drivers to utilise the PS4 controller on a PC from the same page.
Once these tasks have been completed, you can go on to the subsequent phases.

After completing this step, the PS4 controller should vibrate continually in response to the PC. Depending on the game you are playing, the vibration strength may change. However, the majority of its characteristics would be continuous. If you wish to personalise how the PS5 controller functions on your PC, you may download the DS5Windows programme for Windows 10 and Windows 11 computers.
Method #3 Use Third-party Apps Like iVibrate
If you want to take your PS4 controller’s vibrations to the next level, you may utilise an external tool like iVibrate. As long as the controller is connected to your game system, you will be able to override basic settings and make the controller vibrate. However, there are a few benefits to utilising iVibrate on your smartphone. iVibrate, for example, is compatible with Windows, Linux, and macOS. Yes, you read it correctly; you can connect your PS4 controller to a Mac and modify its vibration functionality.
Actions outlaw below.

Follow instructions
You must keep in mind that the iVibrate app elevates the situation. You may easily adjust both the pattern and strength of the vibration process. If you asked us, this would be the most customisable choice available. Obviously, it has a few restrictions.
Despite all this, you can depend on the iVibrate software to make your PS4 controller vibrate continually.
The I Vibrate software must be use to control additional gamepads. For instance, if you want your Xbox Controller to vibrate continuously, you may do so. However, you should consider how these measures would impact the device’s total battery life. And we recommend using this option only if the PS4 controller is linked to a PlayStation console or PC.
Here are the most effective methods for making the PS4 controller vibrate continually on a PC. On the other hand, game-based vibration is simple to configure and utilise. In addition, it is conceivable that an external application is causing your PS4 controller to emit a beeping sound in the absence of any previous problems. In that case, you can review the most reliable ways for resolving PS4 beeping difficulties.
Read More: https://hackanons.com/2021/07/how-to-make-ps4-controller-vibrate-continuously.html
How to enable and disable vibration in the PS4 controller?
Navigate to Settings à Device to activate or disable vibration on the PS4 controller. Must be able to locate an option to activate vibration on the website. We have can also disable vibration on the same page if you do not want it to drain the battery. You must remember that the PS4’s settings do not permit sophisticated modification.
Can you make this PS4 vibration continuous?
Yes, it is possible to make the PS4 vibrate continually, but not the PS4. If you have linked the PS4 controller to your Mac, PC, or Linux, however, it is possible. To accomplish this, however, you must install an application such as DS4Windows or iVibrate. You may select between these two applications based on their compatibility and the features you require. DS4Windows is superior if you want minimal controls, for instance.
Read More:
https://techrt.com/how-to-make-ps4-controller-vibrate/
Also Read: Scratching the Surface of Python
Also Read: Best Bluetooth Headphones for PUBG Mobile
Also Read: How to enable SSH on Ubuntu 20.04?
Also Read: Difference Between Fog and Edge Computing
Also Read: Top 10 Free Online PC Games
Also Read: How to view a private twitter account? [ 2022 Updated ]