
How to install Mono on Ubuntu 20.04?On the Ubuntu system, TeamViewer is acknowledged as efficient software that facilitates transfer of files. Its basic feature is to transfer data and the remote control access through which you can connect and control your computer from anywhere you want. This application is also useful when sharing desktop, online meetings, and web conferencing. Its features make it very convenient to use. Compatibility of this software is very good with most operating systems like MAC iOS, Linux, Android, and Windows. As online approach is the preferred one to carry out tasks, this increases the demand for software such as TeamViewer has become very popular for the mentioned. We will now show you a methodical approach to download TeamViewer and to install it on Linux Ubuntu 20.04.

The Installation Process
This involves some steps which lead to installation of TeamViewer on Ubuntu. The steps are very simple and the installation process proceeds very swiftly and without any hindrance and takes very limited time to get completed.
Step 1: Installation of prerequisites
Step 2: Downloading TeamViewer
Step 3: Installing TeamViewer
Step 4: Start-up the application
Installation of prerequisites
The requirements needed before installation of TeamViewer on Ubuntu 20.04 are sudo and wget or curl. Linux system is approached through sudo.
$ sudo apt update

$ sudo apt install gdebi-core wget
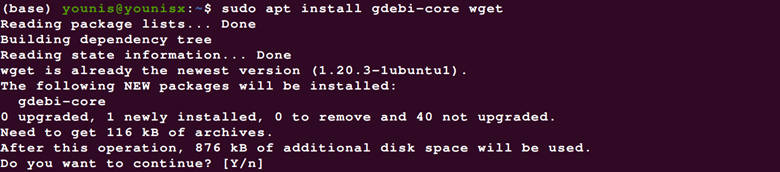
Wget can be installed to the system via APT package if it is already present in the system. To get the latest version of TeamViewer downloaded the download assistant command-line of wget or curl is of great help.
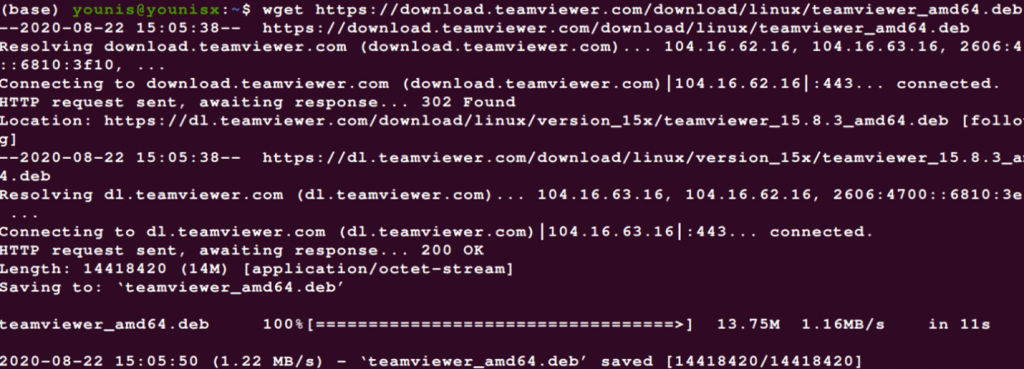
Downloading TeamViewer
The following command is used to download the Debian package:
$ wget https://download.teamviewer.com/download/linux/teamviewer_amd64.deb
Installing TeamViewer
Now TeamViewer can be installed on the Ubuntu by applying the following command:
$ sudo apt install ./teamviewer_amd64.deb

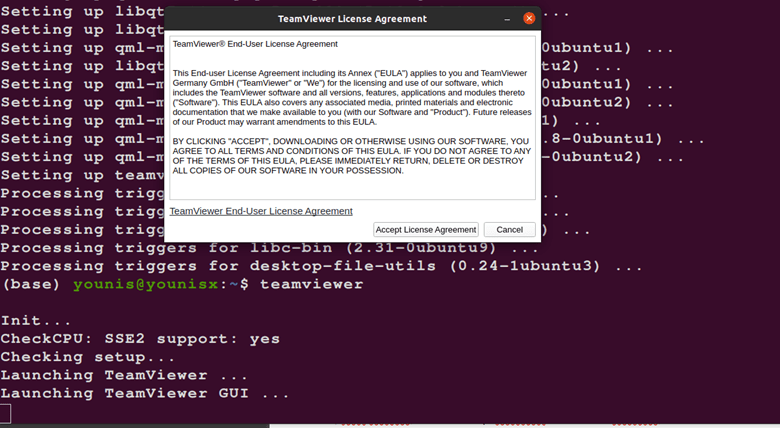
Start-up the application
The display screen shows all features of TeamViewer with installation permission dialogue. When you give permission then the installation process will get completed.
The installation process completes with the activation of TeamViewer. The startup is done through searching TeamViewer in the search bar or using the following command:
$ teamviewer
The application is ready to begin with and you can make use of all features and attributes of TeamViewer on Ubuntu with ease.
Conclusion
This guide enables you to install and work with TeamViewer on your system with convenience. The sudo command eliminates the need for permission access and thus process is completed more smoothly. You can access you fellow’s system without any hindrance by using ID and password of your fellow’s computer. Utilizing the Wget command because of its compatibility with the system helps getting updated application thus making latest version available for the users.
Author Info
My name is Akhunzada Younis Said. I am a software project manager in HAZTECH, a software engineering graduate and a content writer. I love working with Linux, Data science and open-source software.
Also Read:


